So after a little time struggling with my original tower and the UV maps it produced I decided to scrap it and start again from scratch. This time I made my tower more simplistic and I made sure that certain parts of it were separate from each other so, for example the 'legs' at the bottom of the structure are all separate models and are not connected to the main tower. Once I had finished the 3D modelling I took a look at the UV's and this time, now that It had been fully explained to me, I found It a lot easier to start unwrapping and making my UV's neat and tidy.
With this aspect now completed and out of the way, I was able to start adding the textures I had found earlier on in the project. Luckily for me, I had found a lot of seamless textures so there wasn't a lot if image manipulation needed which made everything a whole lot easier. The two images bellow are what my final tower model looked like once it was completely unwrapped and textured. I think my favourite part is the pearly roof to the building as it is just pretty to look at.


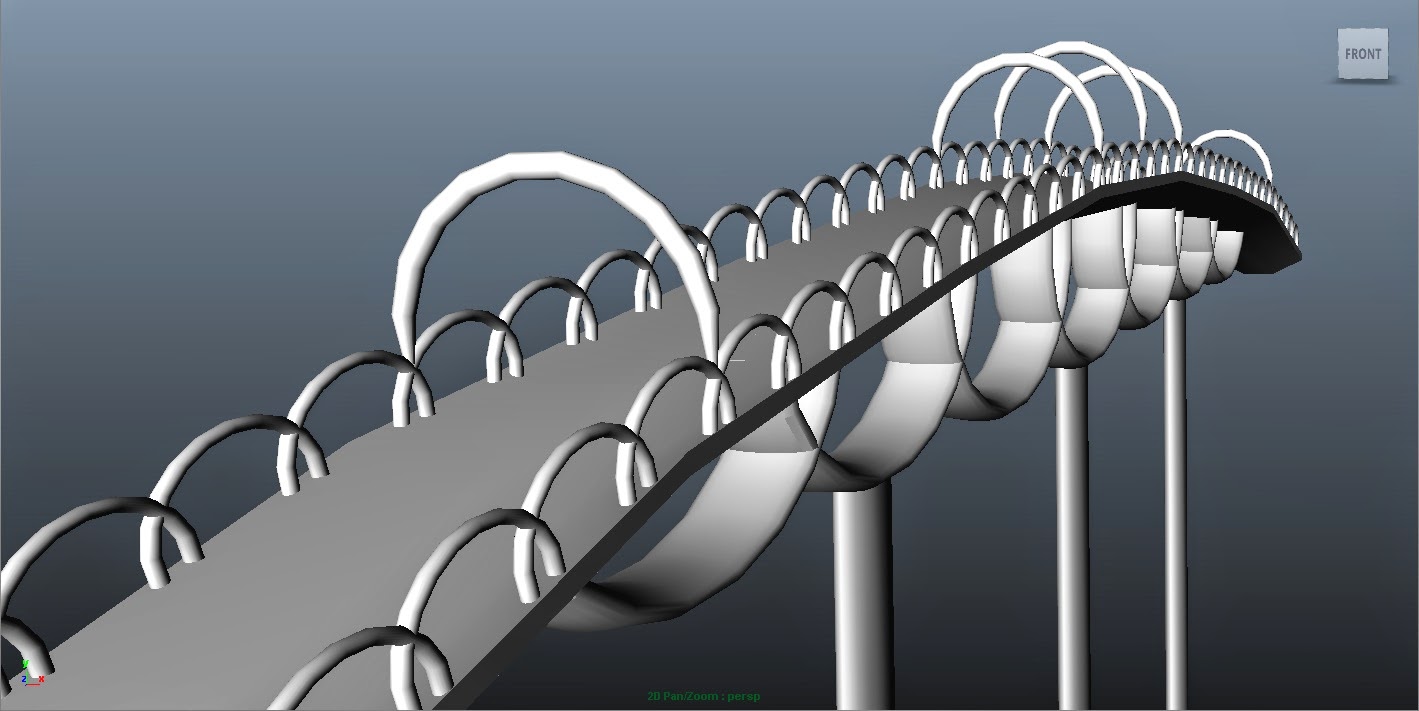
The bridge
Due to the fact that I spent quite a while actually getting started with my project and that I was texturing and UV mapping as I went along, it put me a little bit behind so I immediately started working on the bridge. I had roughly sketched out a concept of a basic bridge that had a simple design to it which I thought would be perfectly fine but when I actually modelled it I released quickly that it was far too simple and that I needed to up my game and this is really when I started to concept actually in Maya. I really liked the looped support structures on the underside of the bridge but noticed that they were sort of hidden out of view from the 'player' so I thought it would be fun to mess around with this theme a little more and try adding some more loops along the edges of the bridge. This actually turned out really nicely, giving my bridge a more detailed but still quite a refined look.

Putting everything together
Once I had completed my two most important modelled and was satisfied with how they looked, I was very excited about starting pulling everything thing together and lay it all out like how I had been picturing it. Then I ran into a problem. I wanted to use the towers I had finished modelling to create other buildings and build up my castle, But my laptop decided it was having none of that and started working and a excruciatingly slow speed. I couldn't figure out why it was struggling so much with such a simple task as making a second tower. I decided to leave my model until I got back to University and use the computers there as I was certain that they would be able to do what I couldn't using my laptop. Wrong. I had the exact same problem all over again which was really very frustrating. I asked one of the tech advisers if they could have a look at Maya and see what my problem was and he managed to find the root of this pile up straight away. I had been using 'copy and paste' instead of doing what we were actually supposed to do and use 'duplicate' ... whoops.
Baring this in mind and using the 'clear history' tool, I was back on track and working at a fast pace. I used my rough concepts a base and started to build up my castle. I realised I had been a little ambitious with the amount of buildings I actually wanted to add so I did a little concepting in Maya to work round this problem and slowly, my castle started to take form.


My final castle design
After a large period of time I spent, modelling, researching, UV Mapping, learning how to do different things in Maya and watching tutorials, I had finally produced a castle I was moderately happy with. I had managed to lay everything out in a symmetrical form so that everything lined up neatly plus I added a few more features like a wall to protect the castle and a rocky terrain that was really simple and fun to piece together. Next, I moved onto applying all of the textures I had collected to make sure they fitted the model, looked appropriate and didn't need any work done to them. Luckily it turned out pretty well so not a lot of editing needed to be done.
I am pretty pleased with how it looks. It has pretty much stuck to the basics of my concepts but it was fun having a re design in Maya as I think I really improved my design and made it, visually, a lot stronger than it was before. Also doing this helped to teach me what Maya, and myself, were capable of with 3D modelling. At this stage I did a few quick renders and I still need to get my head around that just because something looks perfect in the view port, doesn't mean it is going to look great rendered, so this is something I will constantly have to keep in mind and keep referring back to.


No comments:
Post a Comment