Tuesday, 18 February 2014

Contextual Studies Research

Websites

For my contextual studies project I decided to look into the role of a concept artist in the gaming industry. This is mainly because when I first started my course here I had no clue which route I wanted to go down to find a job in the future but after completing my projects I realised the 2D designing definitely is my strong point and I find it a lot more interesting than 3D modelling.
But even with this is mind I actually didn't know that a lot about what a concept artists job was so I needed to do chunk of research to get at understanding of what I was looking into.

These are a few of the websites I read through just to get a basic understanding of what an concept artists job was exactly.


After looking through these I realised that the job is actually quite varied depending which company you go into so I decided to make this the theme of my essay, looking into the different roles and responsibilities of a concept artist. Whilst continuing my research I found two interviews which I liked the look off and took quotes from to use in my essay.


Books
 
I then started to read through the books I had at home, looking for more quotations and information I could use to plan out my essay as I didn't want to get all my sources from the internet. I stumbled across a quote about 2D and 3D concept art which I liked and thought I could use it to help break up my essay a little. It was from the book 'How to become a video game artist. The insiders guide to landing a job in the gaming world' by Sam R. Kennedy. It had some other really useful information in it about the gaming industry in general so I would recommend it to any other Game At and Design students.
The second  book I looked at is 'The art of Alice Madness Returns' with a introduction by American McGee. Alice madness returns is my favourite video game I just had to purchase the concept art book as I fell in love with the art style and concepts as soon as I started playing it. I knew that I would want to include a section about 'Spicy Horse', the company that produced this game so I read the introduction to see what I could find. There is a lovely section on the artists and how they were introduced to the game and from the sound of it is seems that 'Spicy Horse' would be a great company to work for and is now somewhere I am considering applying to in the future.


Monday, 17 February 2014

Personal Drawing

Facial Study

After looking through my recent life drawing sketches I realised I was struggling with realistic drawings as I was so used to creating cartoon inspired pieces. So I decided to have a crack at drawing a realistic human face as it would help me with proportions and emotions when it comes to character designing. It was supposed to be just a regular drawing of female face but I noticed the head was at a slightly creepy angle and after playing a lot of 'Alice Madness Returns' I felt inspired to draw something a little odd so began by giving her lifeless eyes and slightly sad smile. Then I just went a bit crazy and started adding in android pieces along with a tag looped through her ear, representing she is the first of a line of human experiments. This piece is a work in progress and I'd love to import it into 'Corel Painter' and paint over the top. I do prefer drawing my concepts in pencil to begin with as  I feel more comfortable with this method and I am able to express myself better when it comes to my designs.


Life drawing in the castle

I got a little distracted  ...

After my life drawing session I decided it would be a good idea to go up to the castle and do a little drawing as for the previous sessions we were outside and didn't get the chance to go there. This gave me the opportunity to wander through the galleries and see things I had missed the first time like the main hall and the dungeons. After a lot of walking around, looking at things I remembered that I was supposed to be doing some drawing so I found a bust of a Roman lady in the new section they had opened up and I set myself a time limit of 10 minutes. I then made my way into the Natural History room, which is probably my personal favourite and did another 10 minutes sketch, this time of a zebra. I am definitely planning to head back there soon and do some more drawing in the near future.


Drawing studies


Outside drawing
 
During the course of our project we have extra classes to help us improve our drawing skills. For the fist week we went to the forum in the centre of Norwich to practice our outside drawing. I still struggle quite a bit with realism in life drawing and I also need to practice drawing more quickly as I didn't get it finished in time so I am not especially pleased with this piece but I did get most of the basics line work down and can always return to the same spot to complete it.


During the second week we were focusing on drawing water. Water is one of most difficult things to try to draw, traditionally or digitally so it was important for us to give it a try. Despite the draw back of being outside in the cold for so long that my hands went numb I actually really enjoyed this exercise as I think it went a lot better than last weeks drawing session and has convinced me to try doing some more realistic looking drawings as I really think it's going to help me improve.


Life Drawing

Session 1

I must apologise in advance for the photo quality, if I had done them any lighter the glare off the paper would have been too much so this is the best I could do.

For our first life drawing session of this term, we took part in similar activities that we did last project. To begin with we did some quick figure sketches that we had about 3 minutes on each . I am happy that I got the main shape of the model into the drawing but I would have liked more time on each one to be able to go back and add more detail as I am not pleased with how these turned out. I think anatomy really is something I struggle with and is something I hope to improve on.

Next we worked on expressions which is something I am a little more comfortable drawing due to my style being rather cartoony. Again I found time restraints of under 5 minutes frustrating as I like taking my time with a piece and getting in all the details and making it look the best I can be. Similarly with the more detailed facial drawing below, although we had more time I didn't feel comfortable drawing this as I would have liked to have gotten the key features in properly instead of just roughly sketching them. I don't like this piece at all as I made her look much older than she actually is. I know I feel quite negative about my life drawing but I am positive that it is something I can improve on.


Session 2

For our second session we started similarly to the last session we had, starting with anatomy study and figure shape but this time we were given an ink pen to use. Sadly I wasn't really a fan on this pen as we had around 3 minutes on each sketch and I spent most of that time reapplying ink to the nib. Doing some anatomy is something that is really going to help me improve so it needs to be done.

After this we were started looking at hands and even though they are notoriously hard to draw I actually enjoyed this more than drawing the model. We had a little more time on each one and I think they turned out quite nicely even though the fingers are looking a little chubby. We did do a final piece but unfortunately I used a yellow pencil for a part of it and it just isn't showing up in the photo so I left this one out.


Saturday, 15 February 2014

Progression of my Zbrush model

1. The Head

After having a little trouble with the symmetry I finally got it sorted and started working on my characters head, starting off by using Zspheres and working from there. I find that the ZSpheres are a really nice starting point to create a model and are so easy to use. As my design was in 2D I had to work out how all the pieces on her head would work and have to be placed to make it look like my concept. This took a lot of moving and placing but I finally got there.

After that I created a adaptive skin and just keep tweaking it to make sure I was getting the right shapes and that each piece was smooth. I then had a little trouble with remembering how to add the eyes but I got there eventually and ended up with a piece I was happy with.


2. Creating the body and adding the head

I found working on the body fairly easy as I have already had a go before which didn't turn out so well but this time I managed to get it right. Once the adaptive skin was turned on I was able to change the size of the waist and bust to make it fit the design I drew up as they were a little thicker than I would have wanted.

Once I was happy with what I had made I added the head I had previously created in as a new sub tool. The sizing was an issue as I found the 'move' and 'scale' tools very difficult to use this time around as they were never consistent and kept doing what I didn't want them to do. I managed to work it out in the end, only to find that the symmetry on the body I had created has gone slightly off so my tutor Mark had to help me sort it out.

After these string of problem were resolved I was able to mask off an area of a body and create the dress. Unfortunately some of the 2d elements didn't come across brilliantly in this part of the 3D sculpting process but I made do and I am still pleased with how it looks.


3. Adding the back piece and finishing off the model
 
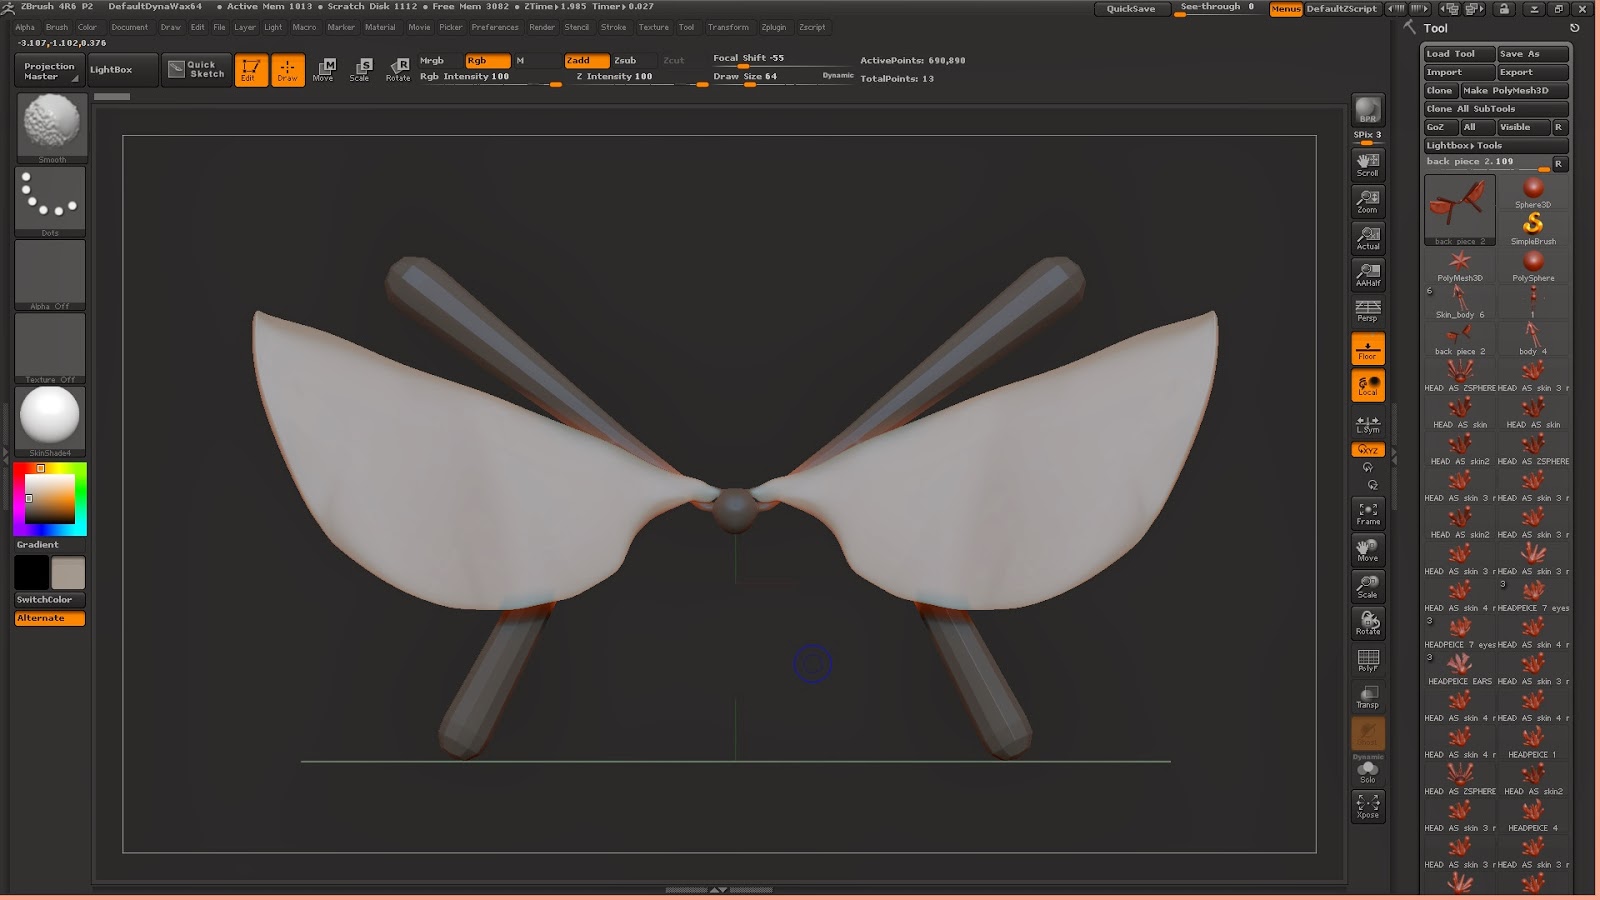
The back piece of the dress was something I was looking forward to creating as this was actually concepting in Zbrush instead of sticking with the design. I needed to make sure it look nice and fitted well at the back so I started off with Zspheres again to get the basic shape and smooth it down.
This worked out nicely and I was then able to add it as a new sub tool and sort out the sizing issue to make sure it wasn't to big. As my character is a ghostly spite I wanted her skin to be smooth without any bumps except from some of the 'wings' which have a outlined pattern on them which I had to add in.
 
After a little tweaking and making sure everything looked right I had completed finished my final design. Overall, for a first model, I am very pleased with it. It has turned out pretty much exactly how I had planned it too.


ZBrush modelling mess up

After I learnt how to create ZSpheres and apply I adaptive skin, I started working on the main body of my nature sprite. This started out really well and I was getting the exact shape I needed and I hoped once is was finished I would be able to start sculpting into this. Unfortunately when the body shape was finished I noticed that the symmetry was no longer central and had gone off to one side. When I first made this error I had no clue what I had done and was incredibly frustrated that I had to redo the whole thing, but looking back on it I think I had pressed the 'perspective distortion' button which had caused it to lose the perfect symmetry. This is something I will have to remember for next time.