Monday, 5 January 2015

The beginning of a new year and university term

BA5 and my first thoughts on the unit 


Today was my first day back to university after the Christmas holidays and it felt great to finally be heading back in lessons as I felt very demotivated to complete any sketches over the break which I am still really kicking myself about. Luckily I came out of the lecture today feeling inspired and excited due to our new brief as it just sounds fantastic.

This BA5 project is a brand new brief that hasn't been completed before by any previous year groups and our class is the first to give it a whirl which puts a bit of pressure on our year to do well. Over the period of six weeks we will be give two different 'Art Tests' that we will have to complete and hand in at deadline. Originally I was freaking myself out a bit as I thought that, from the name, it would be a written exam about the history of art of something along those lines but my fear was soon extinguished when we were given a proper description of what we would be doing. An Art Test is a type of brief that is given to interviewees in the induction process of applying for a job in the game industry at a certain company. It is a test that can be made up of many different parts and range in difficulty and specifications depending on which company you apply for. It is essentially testing the candidates to see if they are up to the standard they are looking for. It is a very important 'test' to take as is shows the employer things such as the artists art style, speed at which they work, ability to follow a brief etcetera to make sure they hire the correct candidate and that there is now plagiarism used. This is a very daunting process that artists must go through when applying for a job and many of them are unprepared for this hurdle but our course leader, Marie Claire, decided that this is something we MUST be prepared for in the future and thought she should give us a nudge in right direction and hopefully the upper hand against other candidates.

So there are around sixteen different art tests to choose from in BA5 and all of them are completely different and cater to different types of art specifications and styles which is a hell of a lot choice when it comes to choosing which one you want to do. Eight of have been created by the tutors of our course and the last eight have been created by different existing companies, ranging in size. For example one will be from the global and successful media company, Sony. And on top of this we were told that members of the companies will most likely be coming in to look at our work in person which is very nerve racking to think about. From the large choice we will be given to choose from we will be asked to pick something we feel confident in doing and choosing an area that we would focus on in the future so I was very excited to hear that there will be a 2D character concept art test that we can choose. I am really looking forward to reading that brief through and seeing weather it is from one of the larger companies or not. If it is a brief from Sony Picture Animations from example I would be extremely excited to complete it but also terrified of letting someone from the company assessing my work!

Overall I am really looking forward to the briefing we will receive tomorrow as it will be going through everything in far more detail and we will also be allowed to discuss which our tutors would our preferred artistic area is and will be allowed to read the tests through. I already know that I want to complete one of the 2D tests as it is the area I want to go into if I am employed by a company in the future so I am really interested to see what the specifications will be for the character concept one.
But with all this excitement for the new brief, there comes a huge bunch of nerves. I am a little worried about completing two different art tests in a period of six weeks, it seems to be a Deja vu of BA4 when we were given a huge amount of work which managed to stress everyone out a lose track of what we were meant to be doing which is something I really don't want to happen again. Also since I managed to get scrape a first for BA4 which I was really pleased with, I know have the pressure of keeping my grade at a similar level and work even harder to get a higher grade which is going to be really tricky for this brief as we have just so much to do and the whole area is completely new to us. Our course leader even said that this brief is very difficult and will be a challenge for us to complete but, negativity aside I am enthusiastic to work hard on this project and try my best to get another good grade and learn a lot about this process.


Thursday, 27 November 2014

Evaluation

How I felt this project went

Overall I am rather pleased with how this project turned out. I was very apprehensive at the beginning when we first received our brief and I was certain that I wasn't going to be able to produce all the work given in the amount of time that we had. But I believe this worry pushed me to work harder this year then I did in my previous projects as I really wanted to do a good job on everything as a lot of things we had to do were a first for me. I did struggle in a through areas of the project. This was mainly in the area of scripting my games mechanics in Unity as I had absolutely no experience with either the software or coding in general so there was a lot of new stuff for me to learn there. The second issue was my time keeping, I spent far to long researching into my concept and designing my level and characters that I certainly didn't leave enough time for everything else which is something that I need to work on for the next project.

On a more positive I think I learnt a whole bunch of new skills, especially to do with creating a game and the documentation that would go with it which is a really important thing to know how to do for the future. I also really enjoyed going right from the basics and actually having a playable game at the end of, it was a really satisfying thing to complete.


Tuesday, 25 November 2014

The process of making my prototype

What has been built, scripted and changed so far


Now that I have a prototype that is as complete as I can get it and with and has working game play I decided to post a full timeline of the creation progress below.


 During the first week of creating my prototype I was really stressing myself out about how I was going to be able to produce a working game in the small amount of time I had given myself as I had been spending the previous weeks working on my games designs and artwork. After I felt confident enough that my artwork was as strong as I could get it I began to start creating my level prototype in Unit. Following the notes I had made in the previous lectures on how to use this new piece of software really helped me get to grips with the interface and basic processes of creating a 2D game. Placing the painted background and sprites in Unity was a fairly simple process and I got this done quickly. Unfortunately when it got to the part were I actually had to start scripting things to make what I had built so far work I started to struggle. I give it a whirl and immediately kept coming to deadends with what I was doing. I tried again and again to insert the scripts from the 'kit bash' level we had experimented with previously but I was obviously doing something wrong as nothing was working.

Luckily I was able to sit down and have a 30 minute talk to my tutor George about the different assets in my game, it's concept and what I want each element to do. As he is a whiz with Unity he was able to fix every scripting problem I had been stressing over in about 5 minutes. He explained each process to me as he did it and manages to get my game to the were there were inserted collision meshes on the platforms and my sprite was able to jump around the level.


First feedback and iterations

After George had assisted me with my scripting I knew that I needed to talk to my classmates about whether they would be able to play test what I had of my prototype so far otherwise as a important part of the creation process is getting peoples feedback and then making changes due to their suggestions and they may be able to see areas of the level that has faults that you have over looked. Due to my level being very basic and fairly awful at that point in time my feedback from my peers wasn't excellent but I did have one common suggestion and this was that I should make my level longer as it just cuts off sort of half way and doesn't lead to anything at the end. This was a fair point and so I quickly started tweaking the background I had created to make the level longer and to have room for a final goal at the end. Below is what my level looked in my first prototype and how it looked after the iteration work.


Original level


New level


Once I had re designed my level to create a longer prototype and added in the changes I received in my presentation crit session from my tutors I was able to start re working and tweaking my prototype. On my own from what I had learnt from George, I was to add new elements to my level and be able to create collision meshes around all of the platforms (which can be seen in the image below) but I knew I would have to start working on adding in new mechanics to my game to improve it's playability. This, of course, meant more scripting which George agreed to help me with.


After having the two extra 30 minute sessions of scripting work from George I was able to start to improve my game by adding in a large amount of mechanics which made the level play through work far more smoothly than it did before. The new mechanics that were included after these sessions were:

  • Being able to collect orbs and when you do, they disappear from the scene. 
  • After collecting 5 out of the 5 orbs that are in the level Light will be sent back to starting position
  • setting up the camera so that it follows the Light as the player moves them through the level. 
  • Falling into the shadows or hitting the vines will instantly kill Light and sending them back to the beginning of the level.
  • Adding a script to the henchmen that allowed them to hit you if you come in a certain radius of them. 


Second feed back and iterations

Now that I felt a little bit more confident with the work I had produced and how my prototype had progressed I went to my class mates and, once again, asked them to play test my game to pick up on any flaws or make suggestions as to things I could change. Luckily no one really said that I needed to change anything drastically design or platform wise which was nice to hear but they did have a few inquiries about possible 'bugs' in the prototype.

The most common thing I heard from people was "isn't your game meant to be set in the dark? Are you going to include this or is that not possible?". This was a absolutely essential part of my game that I knew I needed to get done otherwise my prototype wouldn't be remotely similar to the game play I had been writing about. Even though George had created a rough version of this process which I could always use if worse comes to the worse, I did want a full working script otherwise it would make my prototype look shoddy and actually completing the game would be near to impossible.

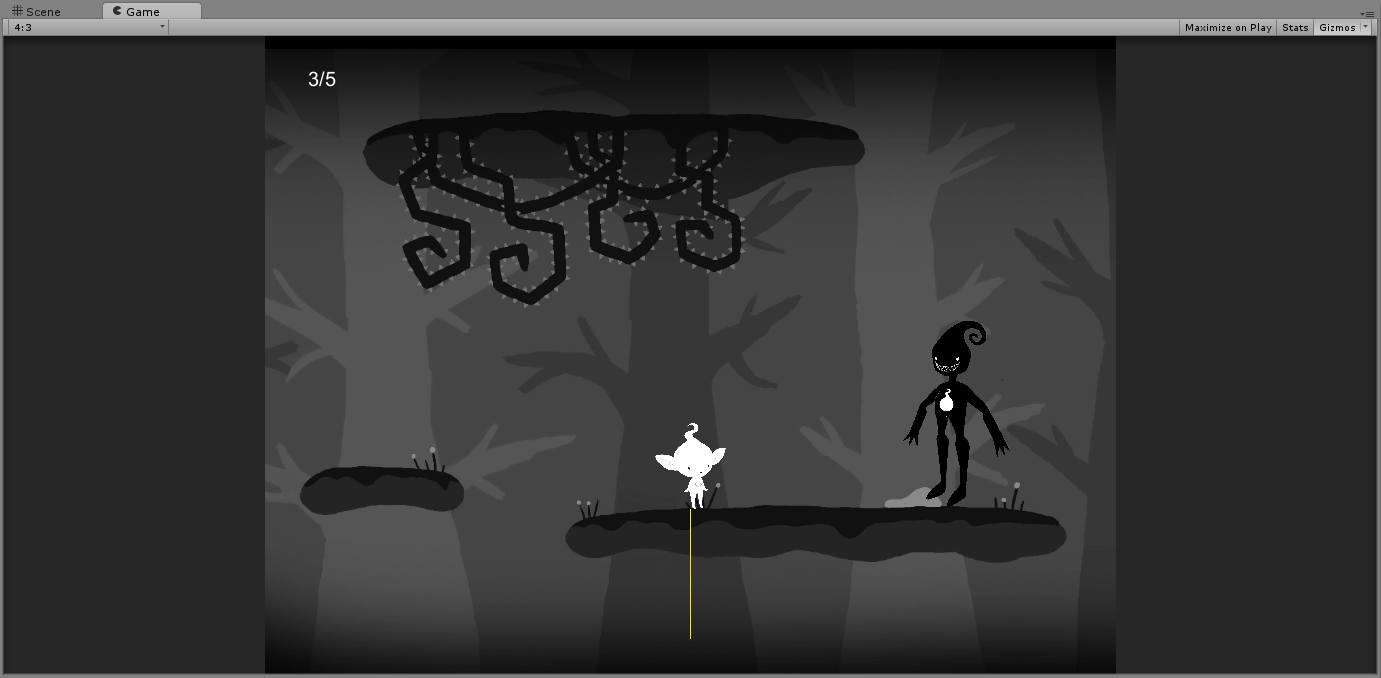
Another point that was raised by my peers when playing my prototype was the fact that the henchmen was able to hit Light but Light couldn't do anything to hit back and would just instantly die, not allowing the player to progress in the level. This unfortunately is another bug within the game that I wasn't too sure how to fix and I did a little research into what the problem might be but I couldn't find anything that would help the situation. So this was something else that I knew I would have to fix otherwise the player wouldn't be able to reach the end goal. An example of the area of the level were you encounter the Henchmen is shown below.


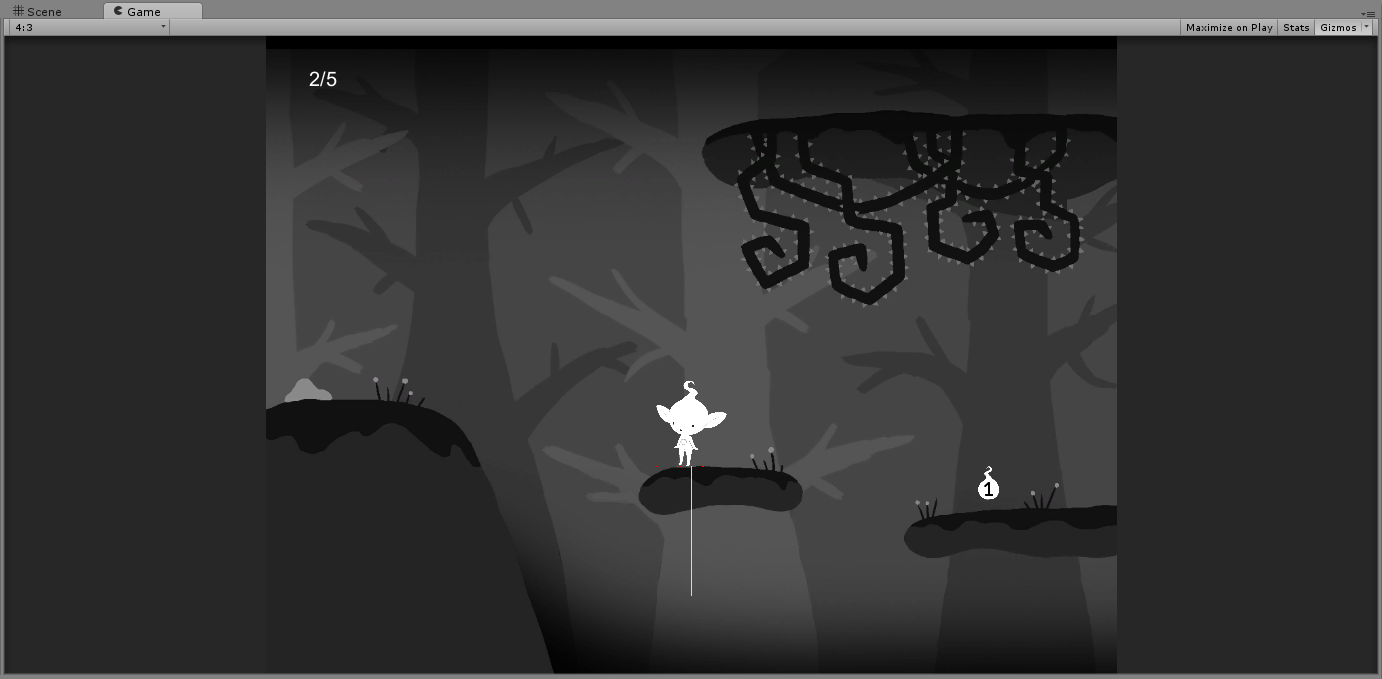
The only couple of things that my peers told me to change so far in my prototype were just very small tweaks that I needed to do on my sprite. The first was to do with the size of Light. People thought that the sprite was a little too big for the environment so I took their advice on board and slightly changed the characters sizing until I was comfortable that it still suited the scale of the level. Secondly I was told to change the elements of the characters jumps height as it was just all over the place when people were trying to manoeuvre around. There is a area of the level, depicted below, where if Light's jump is too high then they will hit the thorny vines every time but if the jump isn't high enough then they won't make the jump down to the lower platform. After this mini crit session I spent a little time editing these elements and then getting people to test the different options until I found a level ground were each 'obstetrical' was no longer and problem. 


Final tweaks and scripting for my prototype


After adding changes to my prototype that had been suggested by my peers I decided to start working on my final prototype, trying to get it as good as I could for submission. I started off by trying to work on the fade effect for the prototype because if I didn't get this element down then my game would have no representation of the memory aspect that I had been focusing on since the beginning of the design process.

I started off by creating a dark rasterized layer I could place over the top of the level with that areas that I wanted to have glowing, for example the orbs, cut out so you would be able to see the background beneath it. With this new layer created I was able to import it into Unity and place it in front of my original background so that the orbs would show through the blank spaces. An example of the layer I created and how it looked when added to my prototype are shown below.
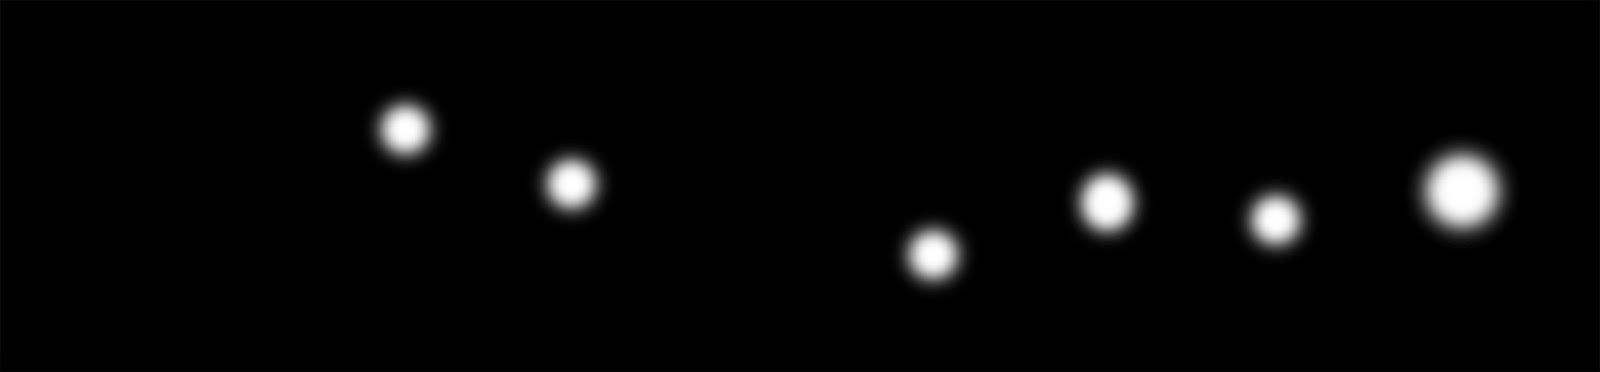
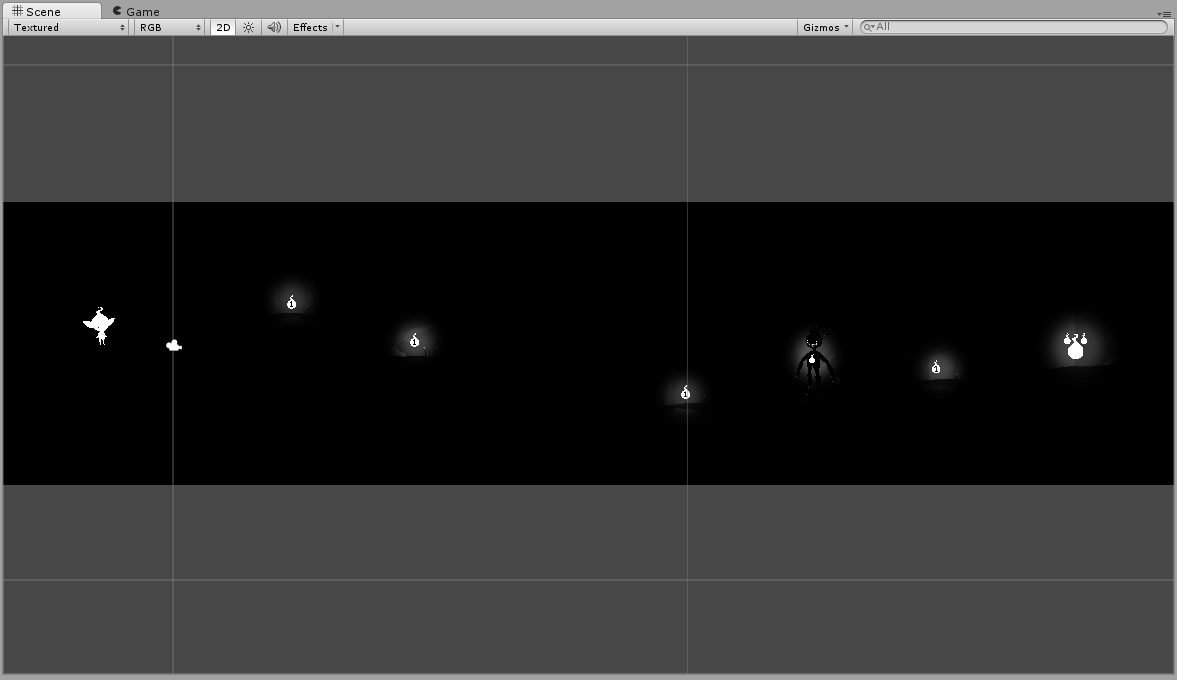


With this element created and imported to my scene George was able to look into and fix the scripting error that had been causing us some trouble which was fantastic! We spent a bit of time tweaking elements of the effect so that it was finalised and worked in game. So basically at the beginning of the level the player gets exactly 10 seconds to see part of the level all lit up until it all gradually fades to black with certain sprites in the level giving off the steady glow. An example of this process can be seen in the images below.
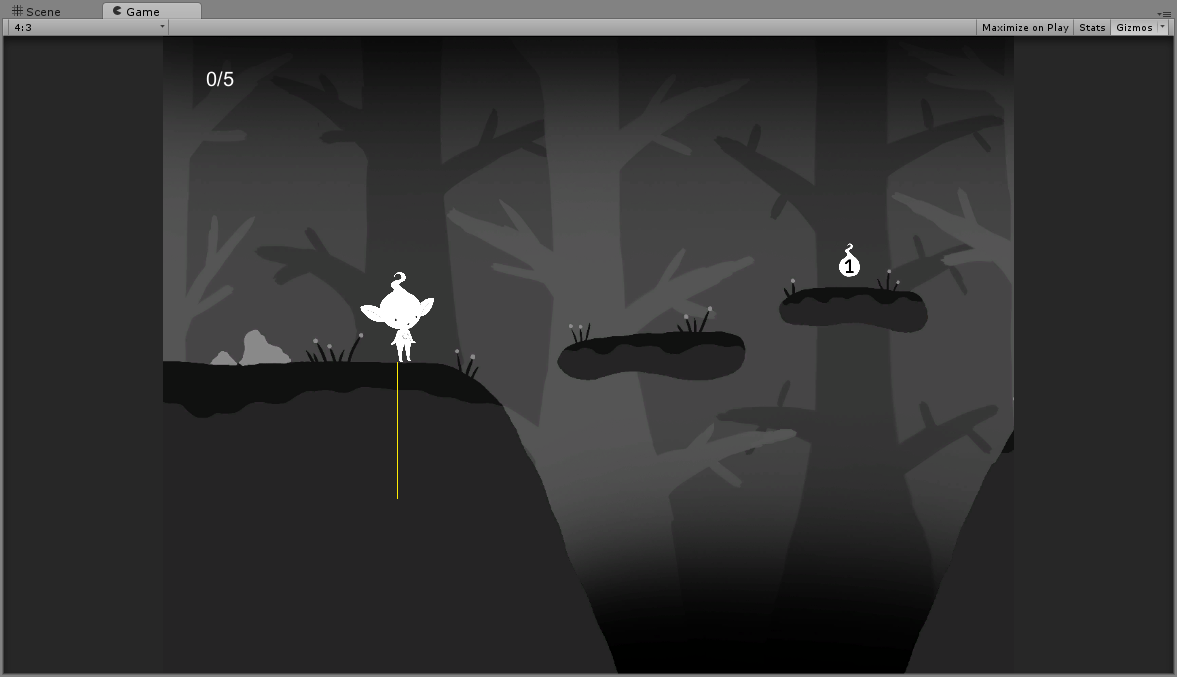
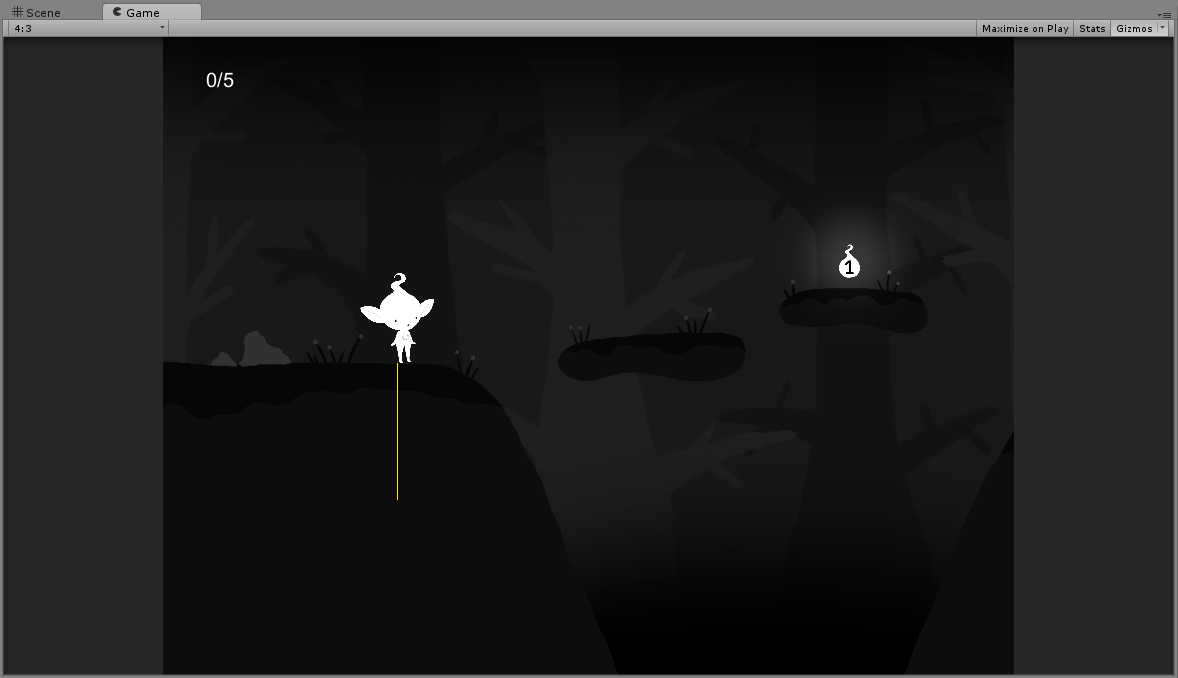
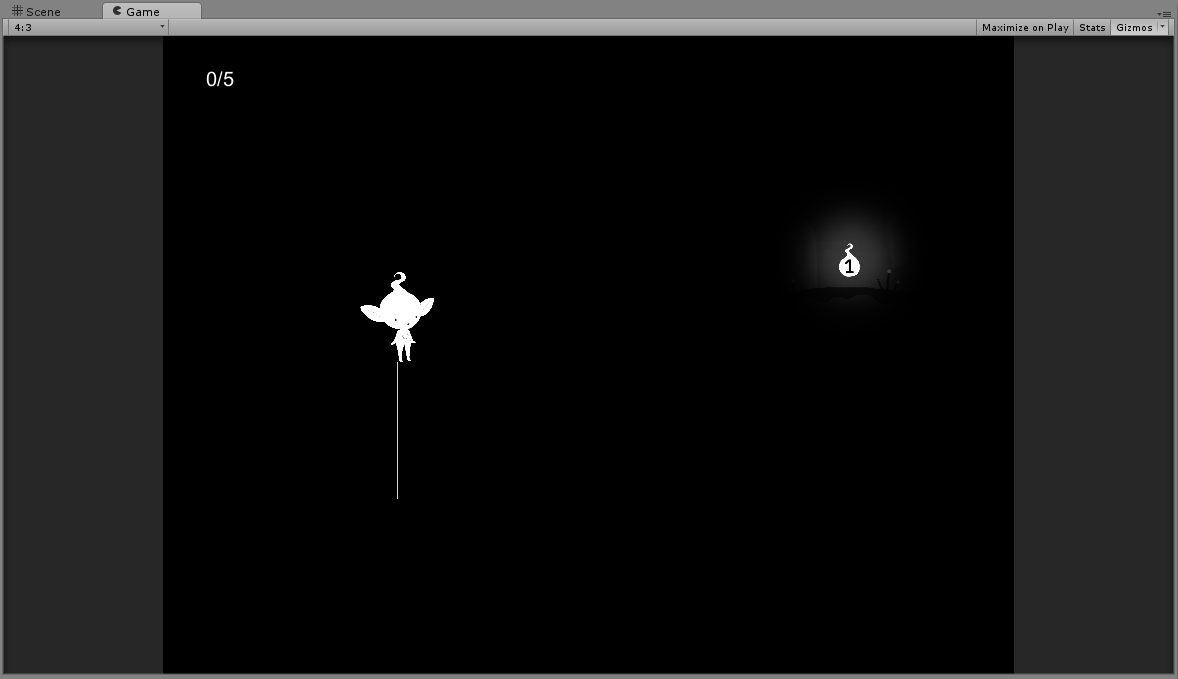


Unfortunately there were two mechanics in the prototype that I wasn't able to include due to not having enough time or knowledge to complete them. One of these mechanics was for the scene to completely zoomed out to begin with so that the player would be able to see the entirety of the level so they could memorise the path before everything slowly faded to black. The scene would then zoom in on the sprite so that player gets a closer look at what is happening as they move through the level. This is quite a big bit of the aspect to have lost from the game-play as now the player can only see a small chunk of the level before the level turns black which is a tad frustrating but, luckily, due to the glow that the orbs give off, they manage to make a path for the player so I am really happy that that design element worked.    

Secondly I wasn't able to create a glow around Light as it would have had to be a constant black rasterized layer that would be seen when the level was still 'lit up' which wasn't exactly the effect I was going for. In the real game Light would give out a soft glow which would allow navigating around the level to be a lot easier for the player but this is just something that I had to move away from. Also the images I used weren't being shown great quality for some odd reason but this was another element that I just had to step back from. 

Luckily I was able to sort of the 'scripting error' with the Henchmen so that Light is now able to hit and kill the enemy and the player can move on through the level. It was as simple as lowering the Henchmen's health down from 100 to 3 as Light would have had to hit the enemy 100 times before it was killed which made me feel a tad silly for over looking this simply element but at least it was fixed. Below are some examples of what the prototype now looks like when in game mode but ignore the yellow line. I have no clue why that is there.


Editing games design document pages

The final tweaks 

Today I attended a feedback session where, as class, we looked at each others presentations and received critical feedback from our tutors George and Mark. I was really pleased with the structural comments I received as they really helped me get some more structure to my games design document.

One of the main things that was pointed out to me was the font size I was using varied from page to page, and that the writing under the storyboard was hard to read. I decided to make all my written pieces size 10.5 font and made all the titles size 18. This allowed me to keep all the information I wanted on my pages without it looking crowded or too small to read. Another thing that I changed was adding a grey border around the title page because as it was being viewed in a PDF format it simply blended into the background so I tweaked it to make it stand out a little more. I was also told to change the title of the page from 'Game overview' to 'Game summary' which I completed.

The changed pages can be seen below.


Sunday, 23 November 2014

Working on my GDD

What I have been working on for the past few days

Over the last few days I have been knuckling down and getting on with creating my games design document. At the beginning of the process I was honestly fairly worried about completing this part of the task as I had never had to make a GDD before and I wasn't too sure how it was meant to be built up. Luckily after a few sessions and lectures on layouts, content and font work I felt a lot more comfortable with the thought of building up my pages so I got to work.

Below are the final designs and layouts for my GDD pages. Originally I had stuck to just using a dark grey background but it ended up looking a little dull so I added in a border to make the pages stand out a little better.  As I have a session coming up tomorrow which will be reviewing our GDD's and getting feedback I may have to make changes to the pages and if so I will post the edited ones at a later time but for now, this is my final games design document.


Extra details about GLOW

Thinking about the music and audio used in game

For another part of our games design document we can mention what sort of music or audio we had in mind for our game or what sound effects we would want to use. I had already decided very early on in the process of character designing that as well as my characters not having genders, they wouldn't speak throughout the entirety of the game. I wanted to give this effect to Light and Dark as it allows the player to envision the character how they like and almost make them their own.

Sound effects wise I knew I wanted little pieces of sound to give off when Light interacted with certain objects so, for example, if Light picked up an orb it would make a shimmering sort of noise, or if they touched a toxic mushroom it would make a squelching noise. To be honest it is rather hard to explain in written terms so I hope that I am making sense.

For the music of GLOW I knew I wanted to stick to a classical composition rather than a modern piece as I wanted my game to have a calming feel to it and I thought something too upbeat and fast paced might change the mood of the game completely. I listened to a few pieces I already knew and also had a browse to see if I could find any new classical music that I found soothing to listen to and that I thought would work nicely with the mood I was trying to set. A few examples of what I found are in videos below. 


Out of all the pieces I listened to, I really favoured all the ones that were in a music box style. There was something quiet simple and calm about it but also mixed with ever so slightly sharper tones than the piano which I really enjoyed listening to. Also whenever I hear a piece of music from a music box It always sounds quite childlike and sweet which is an element I would love to try and bring to my game. I decided to have a little look into free audio files to see if I could find anything that was remotely similar to the Studio Ghibli music box tracks but unfortunately I couldn't seem to find anything longer than 20 seconds or of any good quality.

 The only one I did manage to stumble across that I thought would suit my game is the track below. As it is a free audio file I may look into downloading it and putting it in my misc folder for submission once I've read the terms and agreements of the file.