Thursday, 15 May 2014

Feelings about the project & the help i received
I just wanted to write a little post about how I felt about this project. I think I would have been in a lot of trouble if I didn't have such supportive, friendly class mates who are happy to help me when I get a bit stuck. My lack of experience with 3D really showed through for this unit and for a large amount of the time I was feeling very stressed and worried by it all, but I was able to talk to people about this and they were all really understanding and open, showing me step by step processes which, in the end, helped a lot! I want to say thank everyone who helped me, tutors, especially Lothar, and students. I want to say a big thank you to Luan Vetoreti as he was such a supportive friend and managed to put up with my constant questions. He has been a huge help to many of the students in the GAD year 1 group this unit and I think this should be reflected in his results as he deserves a high score.
Over all I think the help I have received has really improved my 3D knowledge and hopefully I won't feel so worried by it all the next time around.
Contextual Studies Presentation
Our Slides
Once I had spoken to my partner about our presentation structure and we shared opinions and thoughts on each others work, we started to have a read through what each other had answered for our questions. We both had a pretty clear idea of what we wanted to do and had good reasoning behind our answers so we decided it was a good idea to move onto our files. Bellow is our presentation, a collection of screen shots of that will be on each page. We didn't want to write a lot on each slide as we thought it was far more important to have eye catching pictures than I whole bunch of text. I am really happy with the layout as it has given us plenty of things to talk about during the presentation and has kept to the colour scheme of the game Journey, which really is the main drive of our project.


Once I had spoken to my partner about our presentation structure and we shared opinions and thoughts on each others work, we started to have a read through what each other had answered for our questions. We both had a pretty clear idea of what we wanted to do and had good reasoning behind our answers so we decided it was a good idea to move onto our files. Bellow is our presentation, a collection of screen shots of that will be on each page. We didn't want to write a lot on each slide as we thought it was far more important to have eye catching pictures than I whole bunch of text. I am really happy with the layout as it has given us plenty of things to talk about during the presentation and has kept to the colour scheme of the game Journey, which really is the main drive of our project.
Wednesday, 14 May 2014
Working in UDK
The finished product
UDK was definitely a massive challenge and probably one of the hardest parts of the project so far for me. Even though I looked into different ways to try and get the grips with this software, such as watching tutorials on YouTube, reading step by step guides and asking my peers about it, I still found the process difficult to wrap my head round.
I was able to import everything I needed fairly easily, my textures and models were no problem at all due to all the research and notes I had taken during the lectures but as I started to move around my viewport and look at my model up-close, I started to find odd issues with my piece. There were places where my model's structure had been broken, causing it to have gaps and breaks throughout it, but this was only in a few areas such as the glass and loops on the bridge. Once talking to my tutor, he did a lot of typing and editing and managed to sort it out, only for it to revert back to the damaged piece one I re opened the file at home. This was a really frustrating but I didn't really have time to sort it out as I knew I had to move onto my video so I had to just do the best I could and get on with the rest of my work.
I had a little look at a screen captor software called 'Camtasia' after one of my peer's suggested it to me. I watched a video before hand just to get he basics what I would need to before I actually did it. Side note, the narrator in this video is very unprofessional and immature would rather annoyed me as I was watching it but unfortunately this was the most useful tutorials I could find so it had to do. I managed to use this software to create my flythrough, which was then edited on 'Windows movie maker' by cutting and replacing my clips, adding transitions, text and audio.
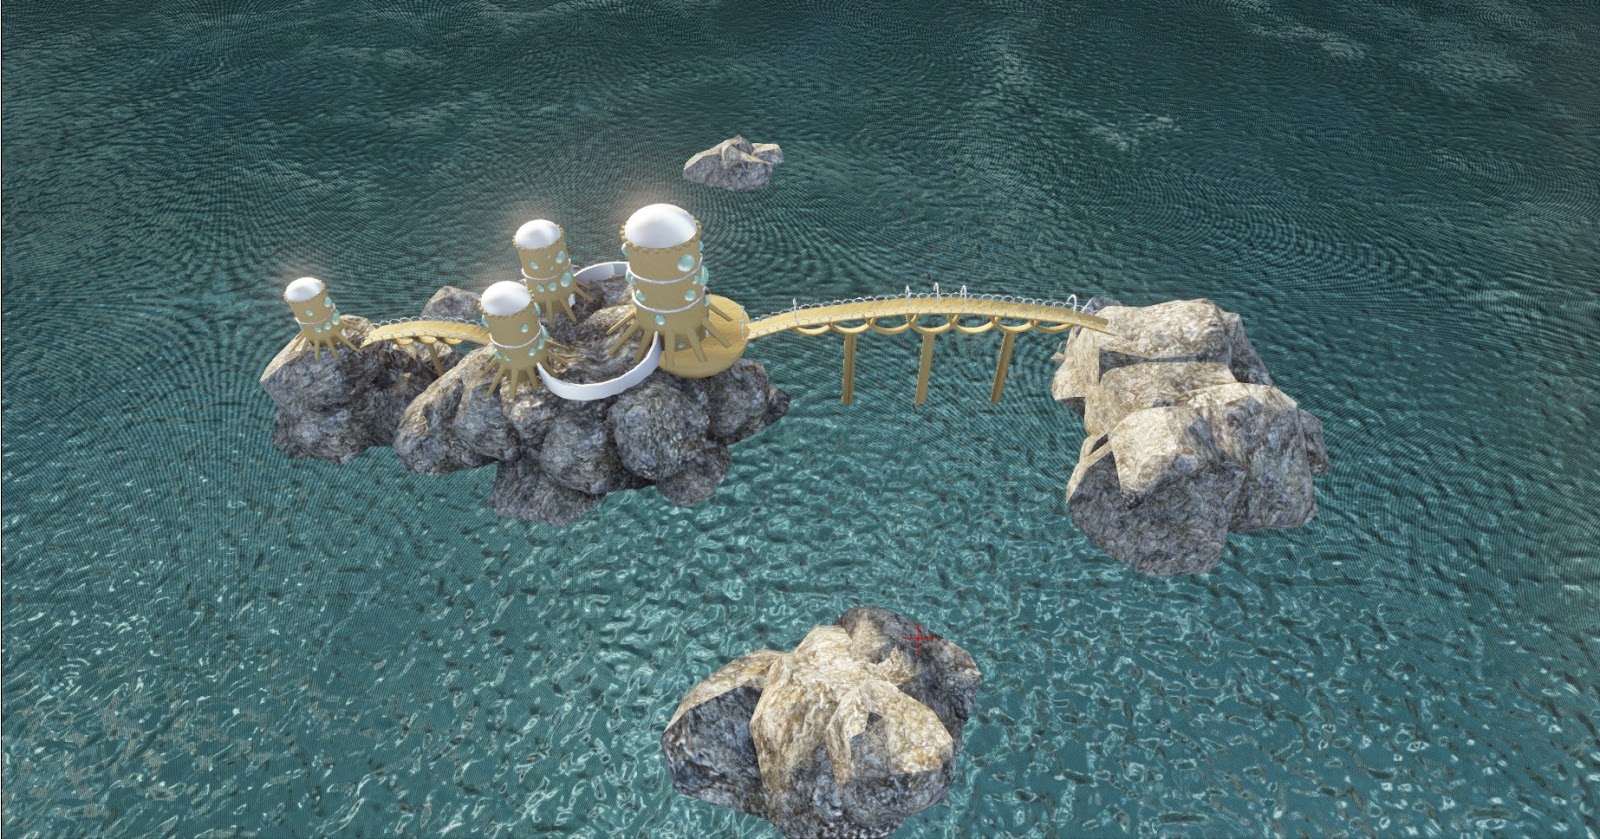
Bellow are screenshots from UDK which I took after completing the importing and re applying my textures, process. Overall I would say that I am not 100% happy with how my work turned out in UDK, due to that fact that it has ALOT of issues with it and also the water doesn't look great at all but it was the best I could come up with. I think working in UDK has made my appreciate how brilliant Maya is and how stunning the renders are it produces, I really do prefer the renders and water I did in Maya to the final produced piece in a game engine which is a little disappointing but honestly how I feel. The video could have also been a little crispier but overall I am pretty pleased with that as video editing is a process I enjoy to do, I find it relaxing.


UDK was definitely a massive challenge and probably one of the hardest parts of the project so far for me. Even though I looked into different ways to try and get the grips with this software, such as watching tutorials on YouTube, reading step by step guides and asking my peers about it, I still found the process difficult to wrap my head round.
I was able to import everything I needed fairly easily, my textures and models were no problem at all due to all the research and notes I had taken during the lectures but as I started to move around my viewport and look at my model up-close, I started to find odd issues with my piece. There were places where my model's structure had been broken, causing it to have gaps and breaks throughout it, but this was only in a few areas such as the glass and loops on the bridge. Once talking to my tutor, he did a lot of typing and editing and managed to sort it out, only for it to revert back to the damaged piece one I re opened the file at home. This was a really frustrating but I didn't really have time to sort it out as I knew I had to move onto my video so I had to just do the best I could and get on with the rest of my work.
I had a little look at a screen captor software called 'Camtasia' after one of my peer's suggested it to me. I watched a video before hand just to get he basics what I would need to before I actually did it. Side note, the narrator in this video is very unprofessional and immature would rather annoyed me as I was watching it but unfortunately this was the most useful tutorials I could find so it had to do. I managed to use this software to create my flythrough, which was then edited on 'Windows movie maker' by cutting and replacing my clips, adding transitions, text and audio.
Bellow are screenshots from UDK which I took after completing the importing and re applying my textures, process. Overall I would say that I am not 100% happy with how my work turned out in UDK, due to that fact that it has ALOT of issues with it and also the water doesn't look great at all but it was the best I could come up with. I think working in UDK has made my appreciate how brilliant Maya is and how stunning the renders are it produces, I really do prefer the renders and water I did in Maya to the final produced piece in a game engine which is a little disappointing but honestly how I feel. The video could have also been a little crispier but overall I am pretty pleased with that as video editing is a process I enjoy to do, I find it relaxing.
Tuesday, 13 May 2014
The next step
Importing into UDK
Now that my model was finally complete in Maya I knew it was time to tackle UDK. UDK is a piece of software used to be able to insert models created and make games, also known as a game engine. I have had absolutely no experience with game engines and know very little about them. We were given only two work shops based on this game engine which, for me, was not nearly enough time as I needed to be able to understand this software. Even though I did make notes, when I read through them again I found myself getting a little bit lost in places and wasn't sure if I was importing my files properly. The first practice I did was a complete failure as I added way to many objects into UDK when I was supposed to do things piece by piece.
I thought, after this disaster that it would be a wise idea to do a little more research into UDK and see if there were any step by step guides for me to follow. Evidently I found a really useful blog post that talked about the different stages of importing and adjusting things in the game engine which were similar to a couple of tutorial videos I was watching at the time too. I really do like watching tutorial videos are they are just so helpful, especially when they take it nice and slow and explain things step by step. Eventually I found myself drifting off and just looking at show reels of work that people had complete in UDK to see it's capabilities and results, I have posted a few bellow.
Now that my model was finally complete in Maya I knew it was time to tackle UDK. UDK is a piece of software used to be able to insert models created and make games, also known as a game engine. I have had absolutely no experience with game engines and know very little about them. We were given only two work shops based on this game engine which, for me, was not nearly enough time as I needed to be able to understand this software. Even though I did make notes, when I read through them again I found myself getting a little bit lost in places and wasn't sure if I was importing my files properly. The first practice I did was a complete failure as I added way to many objects into UDK when I was supposed to do things piece by piece.
I thought, after this disaster that it would be a wise idea to do a little more research into UDK and see if there were any step by step guides for me to follow. Evidently I found a really useful blog post that talked about the different stages of importing and adjusting things in the game engine which were similar to a couple of tutorial videos I was watching at the time too. I really do like watching tutorial videos are they are just so helpful, especially when they take it nice and slow and explain things step by step. Eventually I found myself drifting off and just looking at show reels of work that people had complete in UDK to see it's capabilities and results, I have posted a few bellow.
Blog Post
Contextual Studies Designs
The character development process
Once I had discussed my ideas and concepts with my partner Andrew I had a look into the art style he wanted to work from. The game 'Journey', and indie video game released on March 13, 2012, had a very simple yet effective art style. In most situations, block colouring with only a bare amount of shading looks far too simple but Journey manages to pull it off perfectly as the game is both visually stunning and creative. Below are a couple of images from Journey.


After doing some image research into the appearance of the robed figure you play as in the game, how they were drawn and coloured, and I was able to start work on my designs for Blabber mouth, beginning with a series of silhouettes. I had a pretty solid idea in my head of what I wanted her to look like but at first I was struggling a little to adapt to the new style of drawing I had to do. I like a thick bold outline and more detailed faces in my regular concepts but for this I had to be a lot looser with my designing which is something I had to adjust too, as well as making sure I was sticking to the art style of the game.
I completed a small series of silhouettes, adjusting simple things like patterning on her arms and shoes as well as trying out different hair designs which, in the end, lead me to a design I was keen on using. I decided to choose one of the designs that didn't have her wearing her cap as I thought it was a better representation of her free and empowering spirit instead of her when she is a repressed page. I also kept her tunic fairly similar in each design as this is how I first pictutred her looking when I read the book and I didn't want to stray from this initial design too much as I really liked it. After completing the silhouettes I soon moved onto getting my colours down as this is always a part of the design process I enjoy doing. I tried out two fairly simple colour variations to stick with the low saturation and red to yellow colour scheme of Journey, adding a little bit of purple in for variety before moving onto a far more colourful and eye catching design just to see how it would look in comparison. Overall I liked the colour variation with purple in as she is supposed to be a page to the king and royalty is known for it's deep maroon colours as it is supposed to be seen as regal so I decided that was the one I should stick with.


After going through the design process and picking which colour variation fitted best with my character choice and Journey's art style, I thought it would be a good idea to re draw my concept as a bigger, more detailed and refined image, also in a different pose to show I had completely finished piece. I positioned her in a way that she could be seen in game, armed with her silken gold juggling balls and a determined smile on her face .

Once I had discussed my ideas and concepts with my partner Andrew I had a look into the art style he wanted to work from. The game 'Journey', and indie video game released on March 13, 2012, had a very simple yet effective art style. In most situations, block colouring with only a bare amount of shading looks far too simple but Journey manages to pull it off perfectly as the game is both visually stunning and creative. Below are a couple of images from Journey.
After doing some image research into the appearance of the robed figure you play as in the game, how they were drawn and coloured, and I was able to start work on my designs for Blabber mouth, beginning with a series of silhouettes. I had a pretty solid idea in my head of what I wanted her to look like but at first I was struggling a little to adapt to the new style of drawing I had to do. I like a thick bold outline and more detailed faces in my regular concepts but for this I had to be a lot looser with my designing which is something I had to adjust too, as well as making sure I was sticking to the art style of the game.
I completed a small series of silhouettes, adjusting simple things like patterning on her arms and shoes as well as trying out different hair designs which, in the end, lead me to a design I was keen on using. I decided to choose one of the designs that didn't have her wearing her cap as I thought it was a better representation of her free and empowering spirit instead of her when she is a repressed page. I also kept her tunic fairly similar in each design as this is how I first pictutred her looking when I read the book and I didn't want to stray from this initial design too much as I really liked it. After completing the silhouettes I soon moved onto getting my colours down as this is always a part of the design process I enjoy doing. I tried out two fairly simple colour variations to stick with the low saturation and red to yellow colour scheme of Journey, adding a little bit of purple in for variety before moving onto a far more colourful and eye catching design just to see how it would look in comparison. Overall I liked the colour variation with purple in as she is supposed to be a page to the king and royalty is known for it's deep maroon colours as it is supposed to be seen as regal so I decided that was the one I should stick with.
After going through the design process and picking which colour variation fitted best with my character choice and Journey's art style, I thought it would be a good idea to re draw my concept as a bigger, more detailed and refined image, also in a different pose to show I had completely finished piece. I positioned her in a way that she could be seen in game, armed with her silken gold juggling balls and a determined smile on her face .
Personal Drawing
I have been taking various small breaks from my work this project for a little time to rest and recuperate before continuing with everything and during this little chunks of free time I have taken in upon myself to continue my traditional drawings as it helps me relax and they are something that I really want to improve on. I have noticed in a lot of my pieces I keep drawing my characters from a similar position as it is just what I am comfortable with but I knew it was about time for me to break this habit and try out a new pose. I decided for once I was going to draw a piece with a view of someone from the side as I very rarely do this as, on most occasions, it ends up being rubbed out as I am not pleased with it but this time I was determined to work this drawing because, as a concept artist, you have to draw your design from several different angles so this is a little task I have decided to take on a play around with.
I ended up with this drawing of a young teenage girl and her pet rabbit. Drawing this allowed me to practice a side view of a character in my style and also have a go at drawing prop, meaning the Rabbit in this case. I am really pleased with how this piece turned out and It shows with determination and a couple of references images, your drawings can improve.

I ended up with this drawing of a young teenage girl and her pet rabbit. Drawing this allowed me to practice a side view of a character in my style and also have a go at drawing prop, meaning the Rabbit in this case. I am really pleased with how this piece turned out and It shows with determination and a couple of references images, your drawings can improve.
Subscribe to:
Posts (Atom)